
title: Document redaction
emoji: 📝
colorFrom: blue
colorTo: yellow
sdk: docker
app_file: app.py
pinned: false
license: agpl-3.0
Document redaction
Redact personally identifiable information (PII) from documents (pdf, images), open text, or tabular data (xlsx/csv/parquet). Please see the User Guide for a walkthrough on how to use the app. Below is a very brief overview.
To identify text in documents, the 'local' text/OCR image analysis uses spacy/tesseract, and works ok for documents with typed text. If available, choose 'AWS Textract service' to redact more complex elements e.g. signatures or handwriting. Then, choose a method for PII identification. 'Local' is quick and gives good results if you are primarily looking for a custom list of terms to redact (see Redaction settings). If available, AWS Comprehend gives better results at a small cost.
After redaction, review suggested redactions on the 'Review redactions' tab. The original pdf can be uploaded here alongside a '...redaction_file.csv' to continue a previous redaction/review task. See the 'Redaction settings' tab to choose which pages to redact, the type of information to redact (e.g. people, places), or custom terms to always include/ exclude from redaction.
NOTE: The app is not 100% accurate, and it will miss some personal information. It is essential that all outputs are reviewed by a human before using the final outputs.
USER GUIDE
Table of contents
- Example data files
- Basic redaction
- Customising redaction options
- Reviewing and modifying suggested redactions
See the advanced user guide here.
Example data files
Please refer to these example files to follow this guide:
- Example of files sent to a professor before applying
- Example complaint letter (jpg)
- Partnership Agreement Toolkit (for signatures and more advanced usage)
Basic redaction
The document redaction app can detect personally-identifiable information (PII) in documents. Documents can be redacted directly, or suggested redactions can be reviewed and modified using a grapical user interface.
Download the example PDFs above to your computer. Open up the redaction app with the link provided by email.
Click on the upload files area, and select the three different files (they should all be stored in the same folder if you want them to be redacted at the same time).
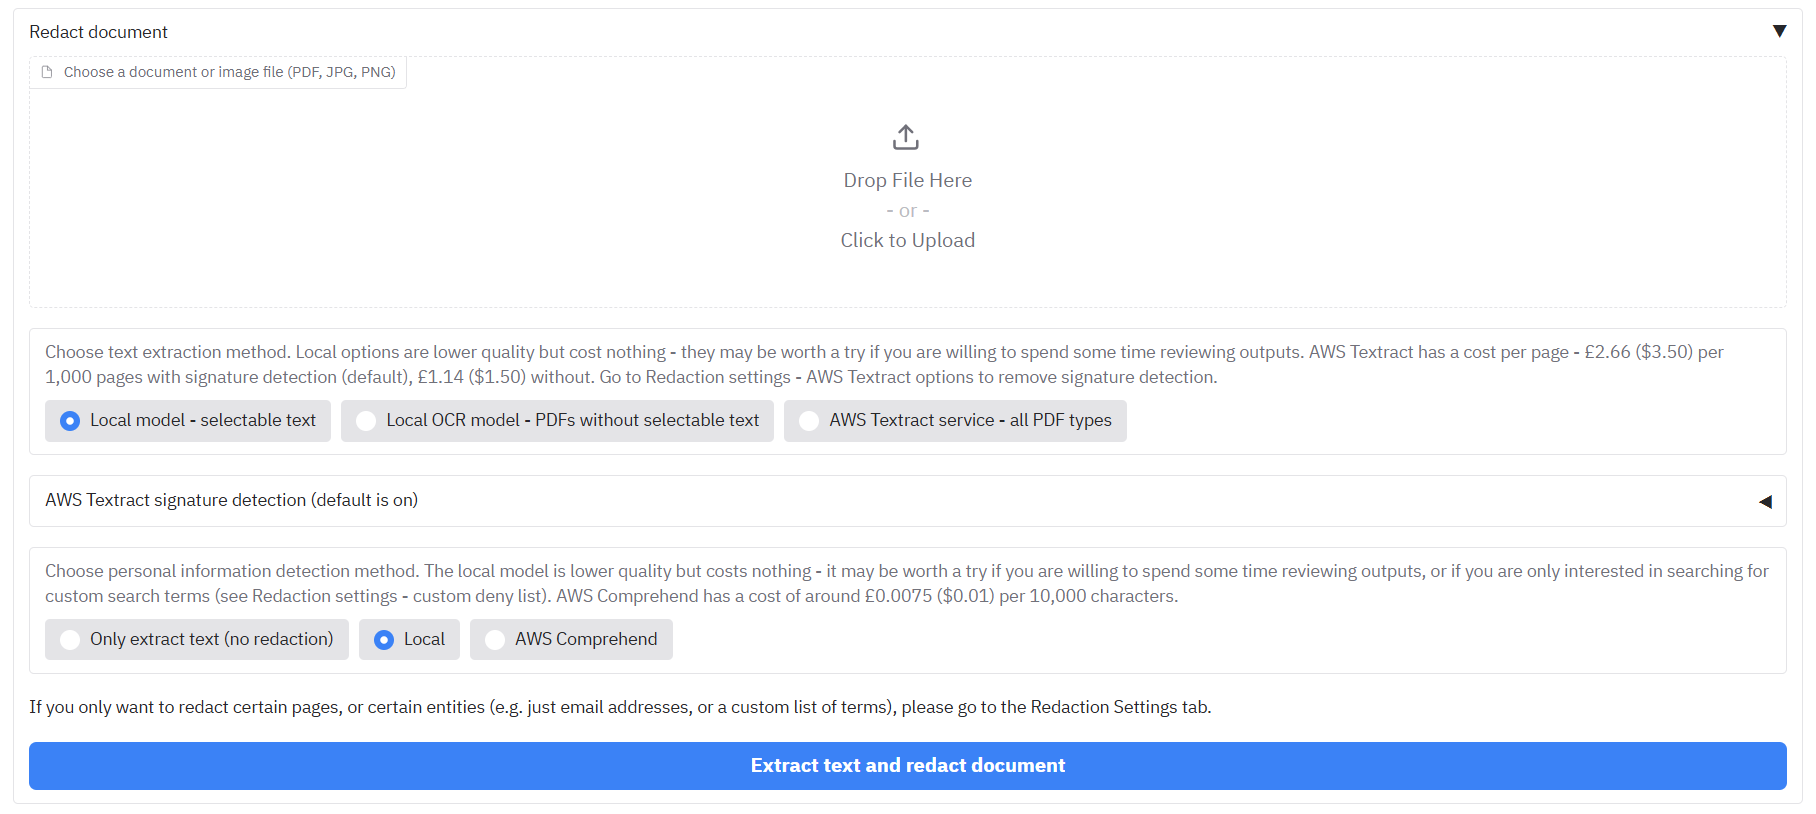
First, select one of the three text extraction options below:
- 'Local model - selectable text' - This will read text directly from PDFs that have selectable text to redact (using PikePDF). This is fine for most PDFs, but will find nothing if the PDF does not have selectable text, and it is not good for handwriting or signatures. If it encounters an image file, it will send it onto the second option below.
- 'Local OCR model - PDFs without selectable text' - This option will use a simple Optical Character Recognition (OCR) model (Tesseract) to pull out text from a PDF/image that it 'sees'. This can handle most typed text in PDFs/images without selectable text, but struggles with handwriting/signatures. If you are interested in the latter, then you should use the third option if available.
- 'AWS Textract service - all PDF types' - Only available for instances of the app running on AWS. AWS Textract is a service that performs OCR on documents within their secure service. This is a more advanced version of OCR compared to the local option, and carries a (relatively small) cost. Textract excels in complex documents based on images, or documents that contain a lot of handwriting and signatures.
If you are running with the AWS service enabled, here you will also have a choice for PII redaction method:
- 'Local' - This uses the spacy package to rapidly detect PII in extracted text. This method is often sufficient if you are just interested in redacting specific terms defined in a custom list.
- 'AWS Comprehend' - This method calls an AWS service to provide more accurate identification of PII in extracted text.
Hit 'Redact document'. After loading in the document, the app should be able to process about 30 pages per minute (depending on redaction methods chose above). When ready, you should see a message saying that processing is complete, with output files appearing in the bottom right.

- '...redacted.pdf' files contain the original pdf with suggested redacted text deleted and replaced by a black box on top of the document.
- '...ocr_results.csv' files contain the line-by-line text outputs from the entire document. This file can be useful for later searching through for any terms of interest in the document (e.g. using Excel or a similar program).
- '...review_file.csv' files are the review files that contain details and locations of all of the suggested redactions in the document. This file is key to the review process, and should be downloaded to use later for this.
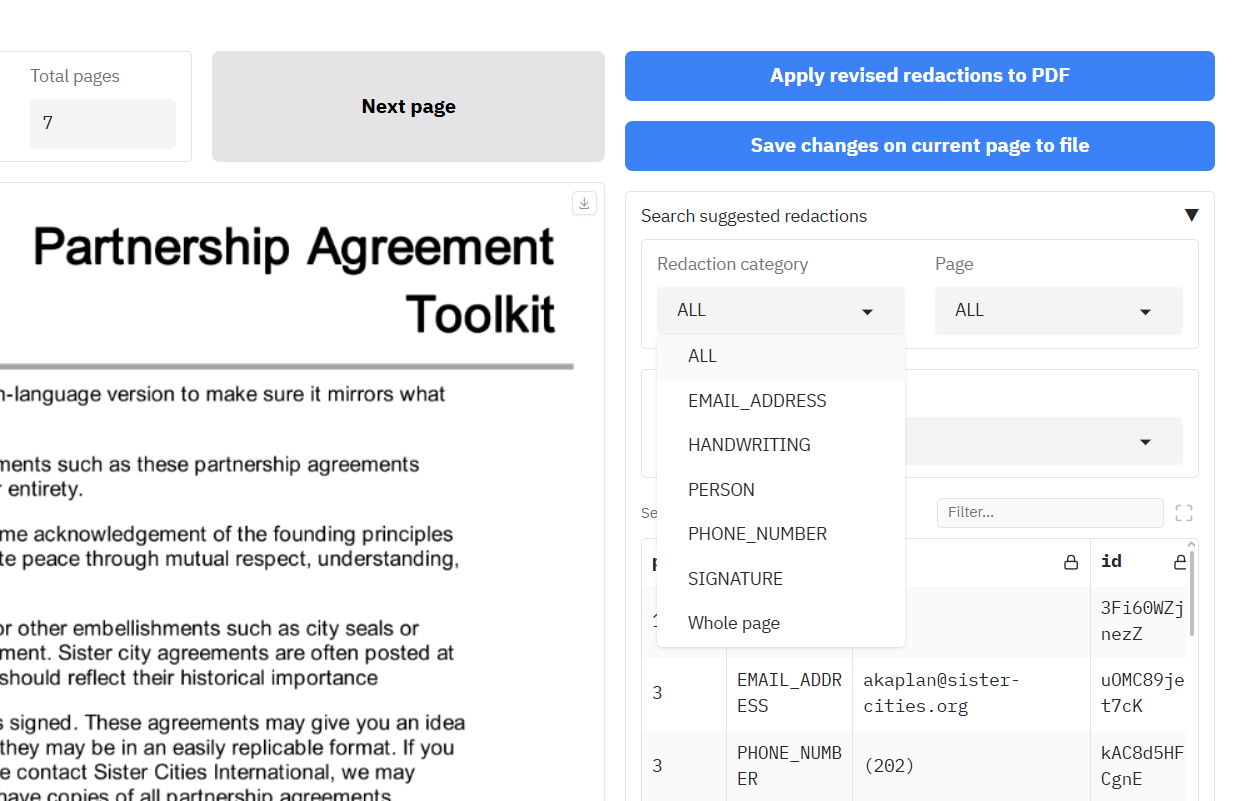
Additional outputs are available under the 'Redaction settings' tab. Scroll to the bottom and you should see more files:

- '...review_file.json' is the same file as the review file above, but in .json format.
- '...decision_process_output.csv' is also similar to the review file above, with a few more details on the location and scores of identified PII in the document.
- If you are using AWS Textract, you should also get a .json file with the Textract outputs. It could be useful to retain this document to avoid having to repeatedly analyse the same document in future (this .json file can be uploaded into the app on the first redaction tab to load into local memory before redaction).
We have covered redacting documents with the default redaction options. The '...redacted.pdf' file output may be enough for your purposes. But it is very likely that you will need to customise your redaction options, which we will cover below.
Customising redaction options
On the 'Redaction settings' page, there are a number of options that you can tweak to better match your use case and needs.
Custom allow, deny, and page redaction lists
The app allows you to specify terms that should never be redacted (an allow list), terms that should always be redacted (a deny list), and also to provide a list of page numbers for pages that should be fully redacted.
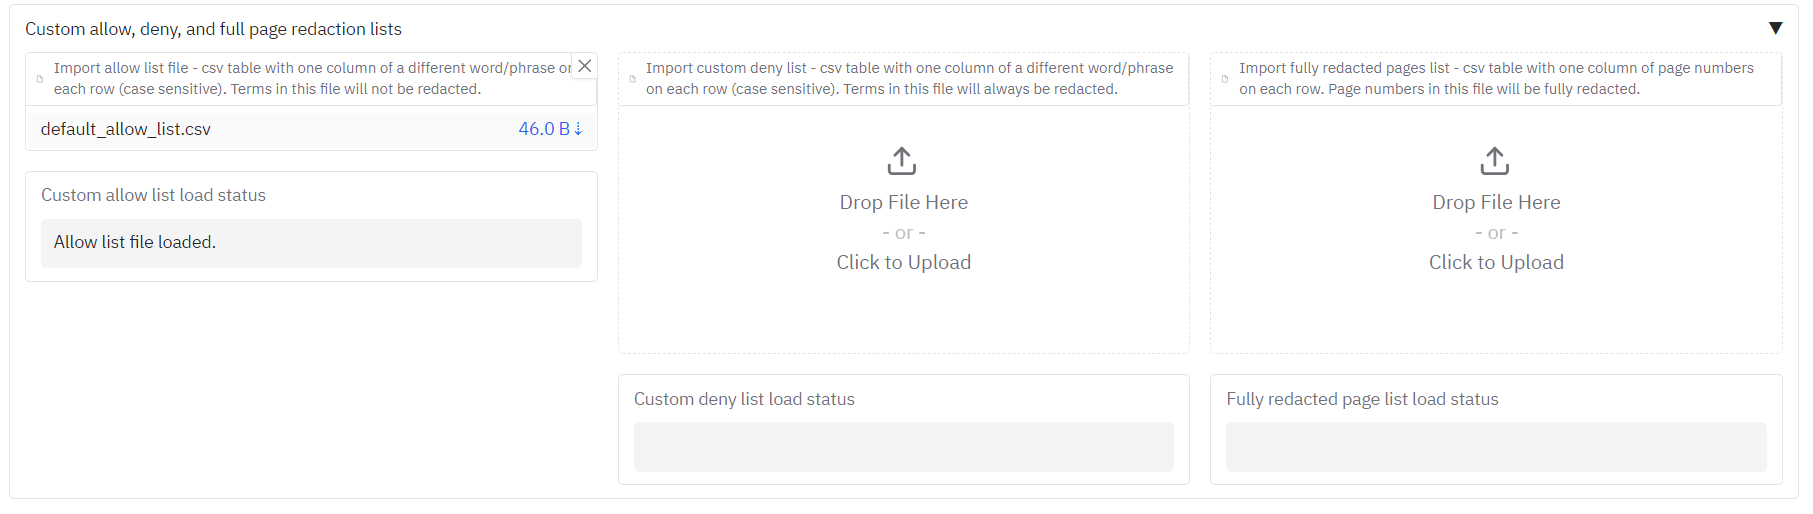
Allow list example
It may be the case that specific terms that are frequently redacted are not interesting to
In the redacted outputs of the 'Example of files sent to a professor before applying' PDF, you can see that it is frequently redacting references to Dr Hyde's lab in the main body of the text. Let's say that references to Dr Hyde were not considered personal information in this context. You can exclude this term from redaction (and others) by providing an 'allow list' file. This is simply a csv that contains the case sensitive terms to exclude in the first column, in our example, 'Hyde' and 'Muller glia'. The example file is provided here.
To import this to use with your redaction tasks, go to the 'Redaction settings' tab, click on the 'Import allow list file' button halfway down, and select the csv file you have created. It should be loaded for next time you hit the redact button. Go back to the first tab and do this.
Deny list example
Say you wanted to remove specific terms from a document. In this app you can do this by providing a custom deny list as a csv. Like for the allow list described above, this should be a one-column csv without a column header. The app will suggest each individual term in the list with exact spelling as whole words. So it won't select text from within words. To enable this feature, the 'CUSTOM' tag needs to be chosen as a redaction entity (the process for adding/removing entity types to redact is described below).
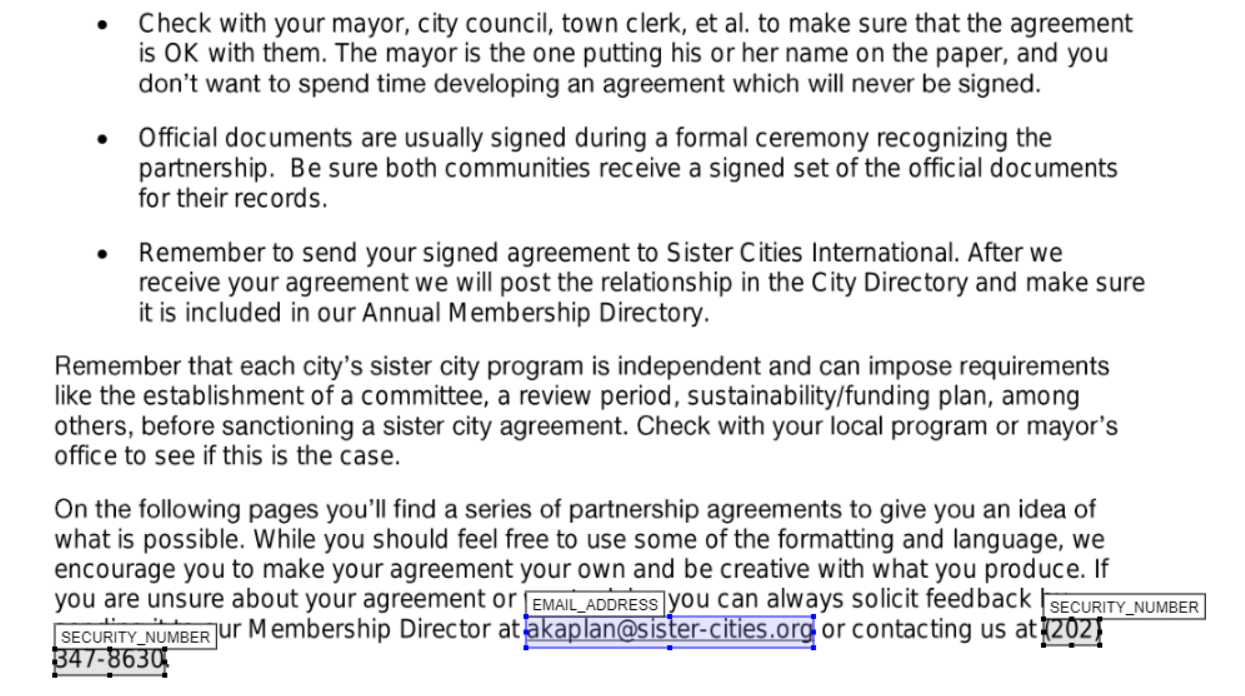
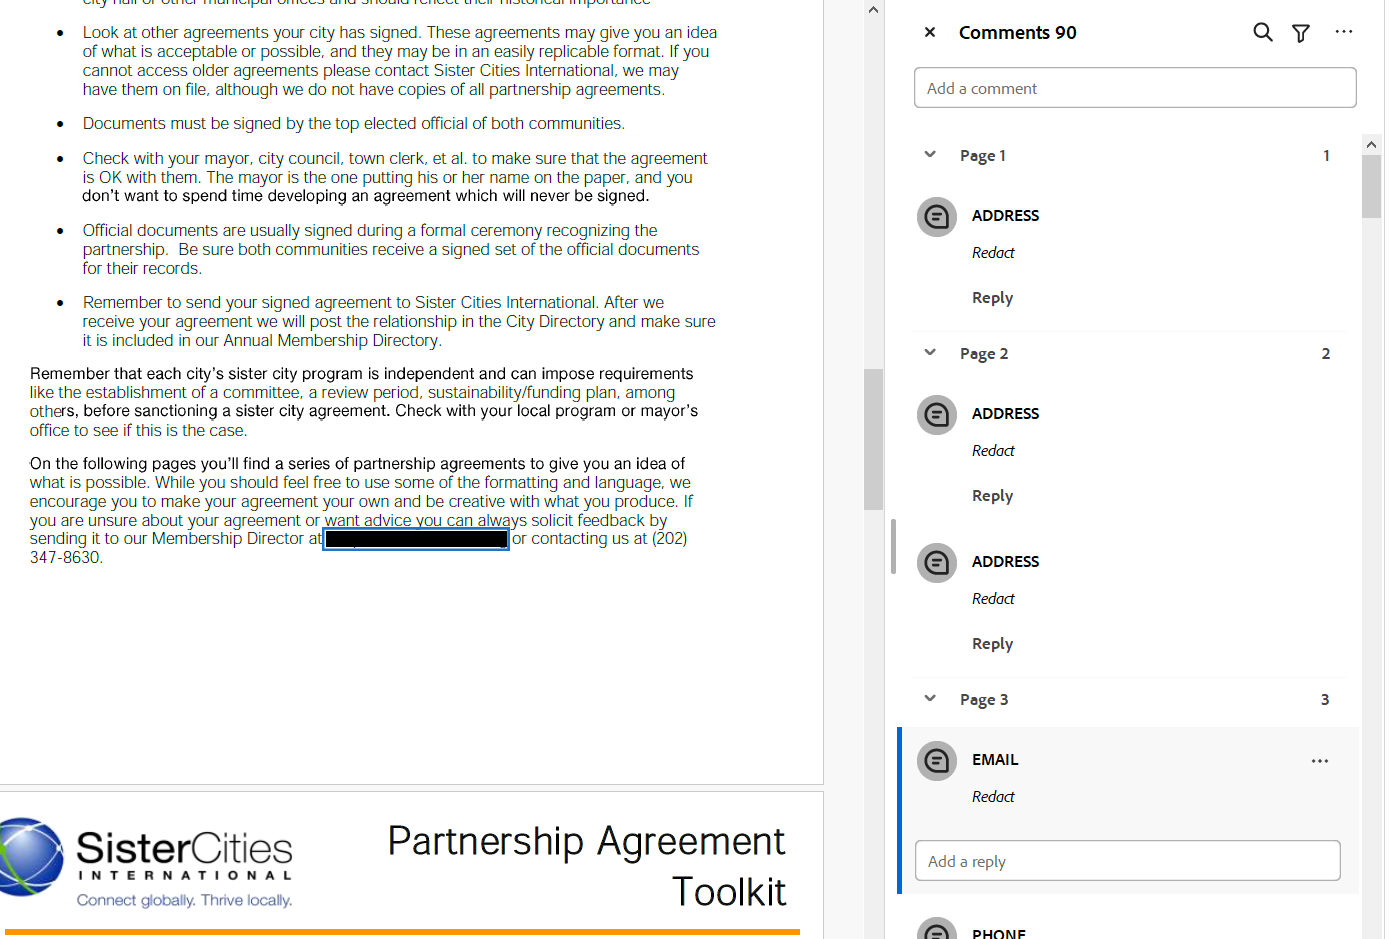
Here is an example using the Partnership Agreement Toolkit file. This is an example of a custom deny list file. 'Sister', 'Sister City' 'Sister Cities', 'Friendship City' have been listed as specific terms to redact. You can see the outputs of this redaction process on the review page:
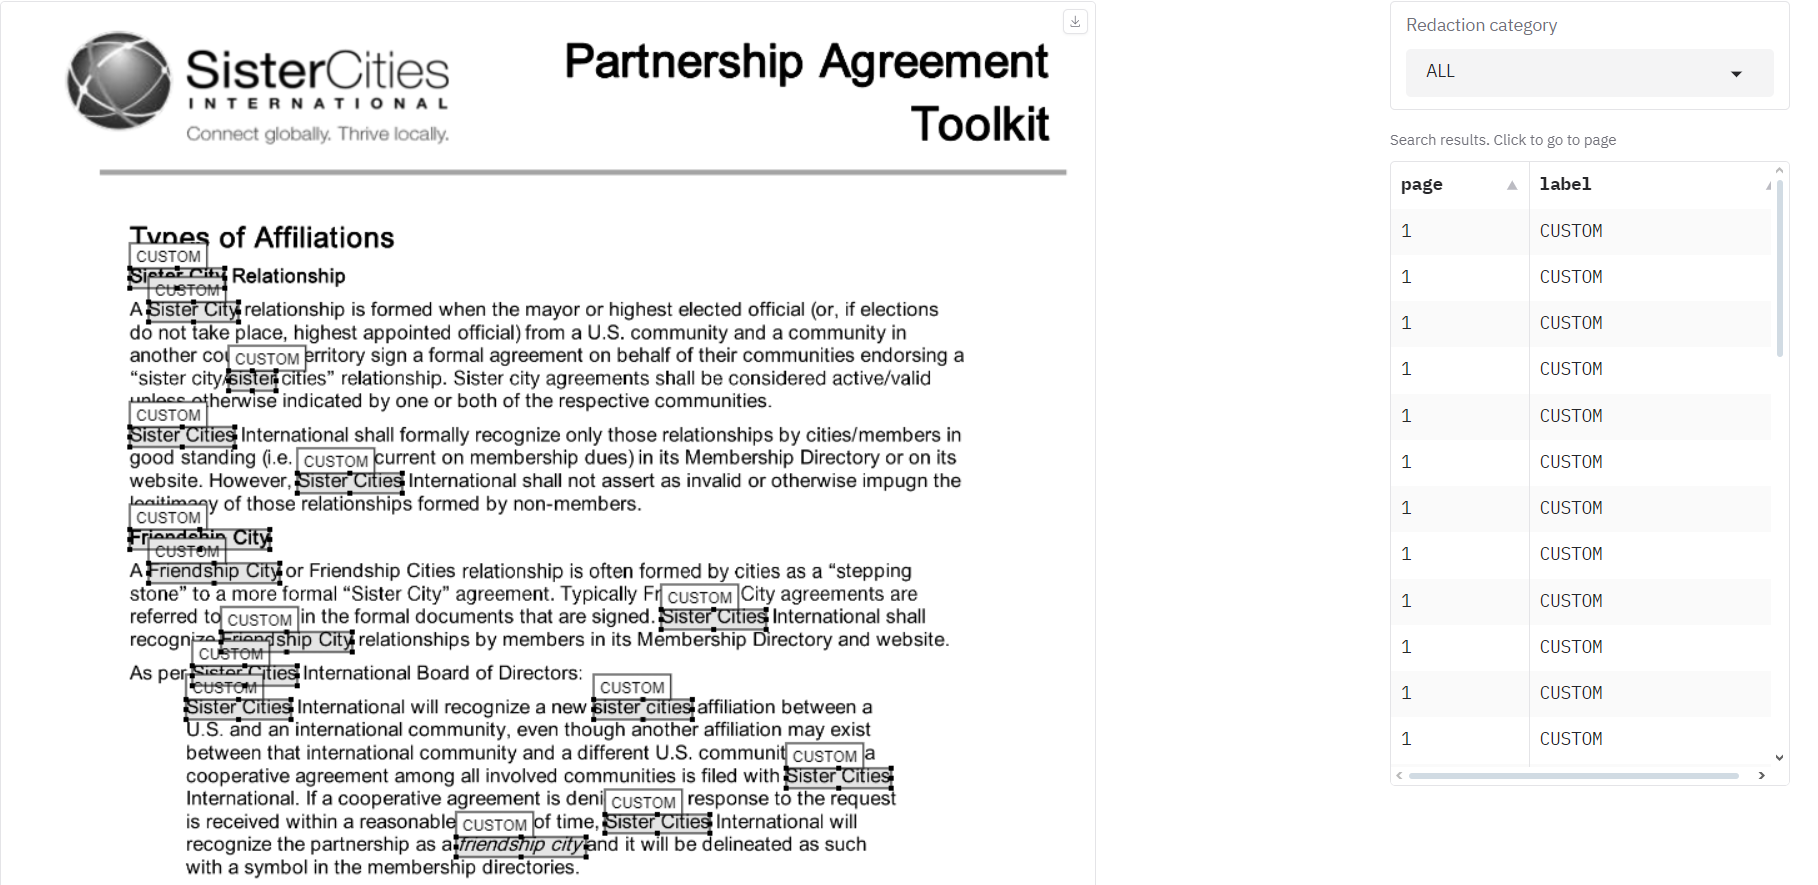 .
.
You can see that the app has highlighted all instances of these terms on the page shown. You can then consider each of these terms for modification or removal on the review page explained here.
Full page redaction list example
There may be full pages in a document that you want to redact. The app also provides the capability of redacting pages completely based on a list of input page numbers in a csv. The format of the input file is the same as that for the allow and deny lists described above - a one-column csv without a column header. An example of this is here. You can see an example of the redacted page on the review page:
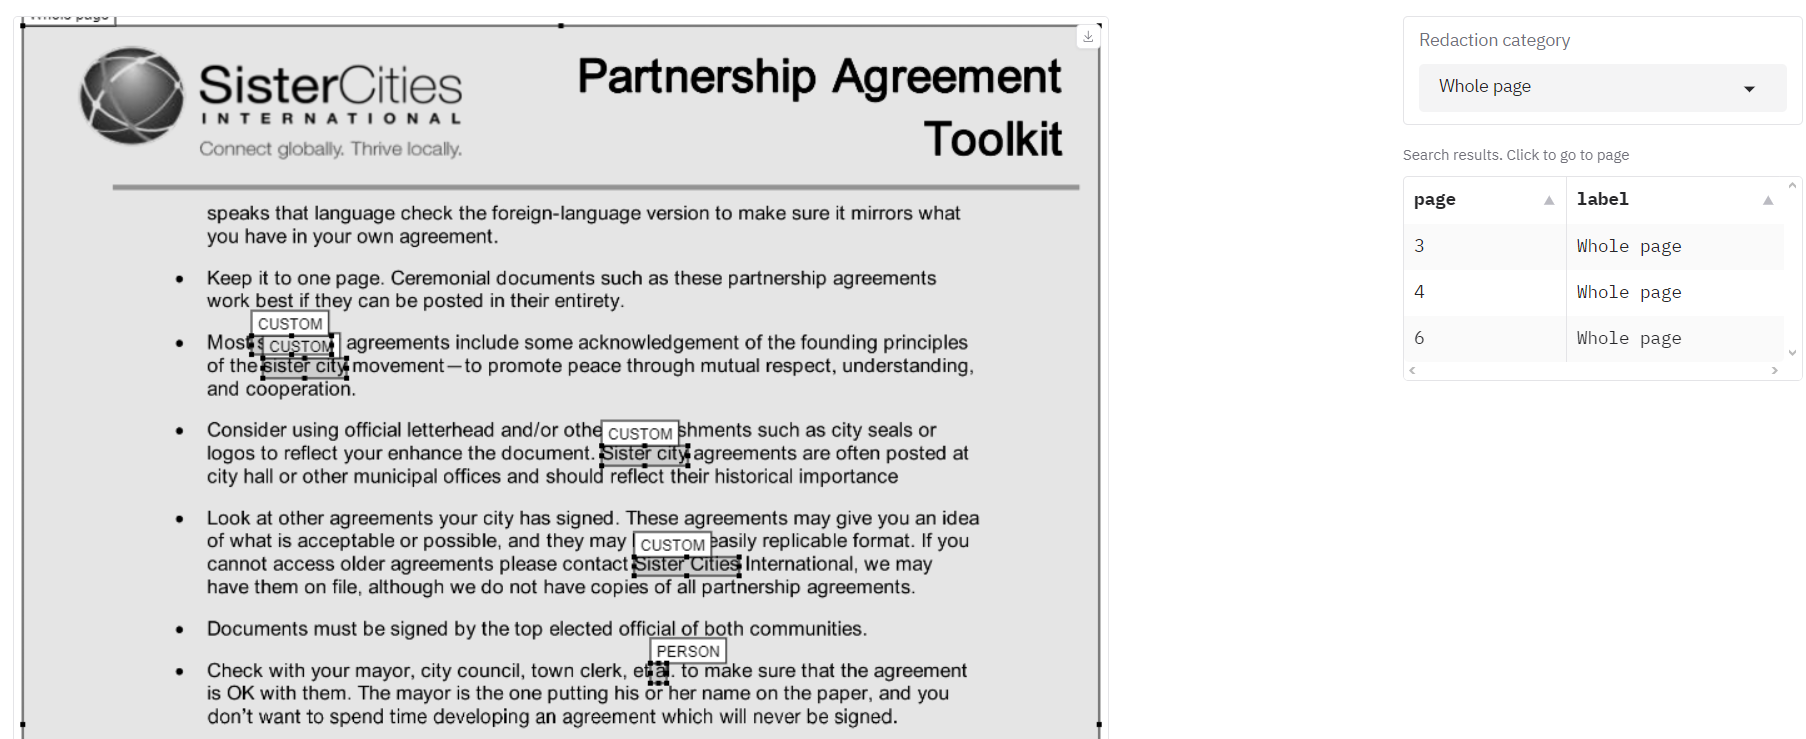 .
.
Using the above approaches to allow, deny, and full page redaction lists will give you an output like this.
Redacting additional types of personal information
You may want to redact additional types of information beyond the defaults, or you may not be interested in default suggested entity types. There are dates in the example complaint letter. Say we wanted to redact those dates also?
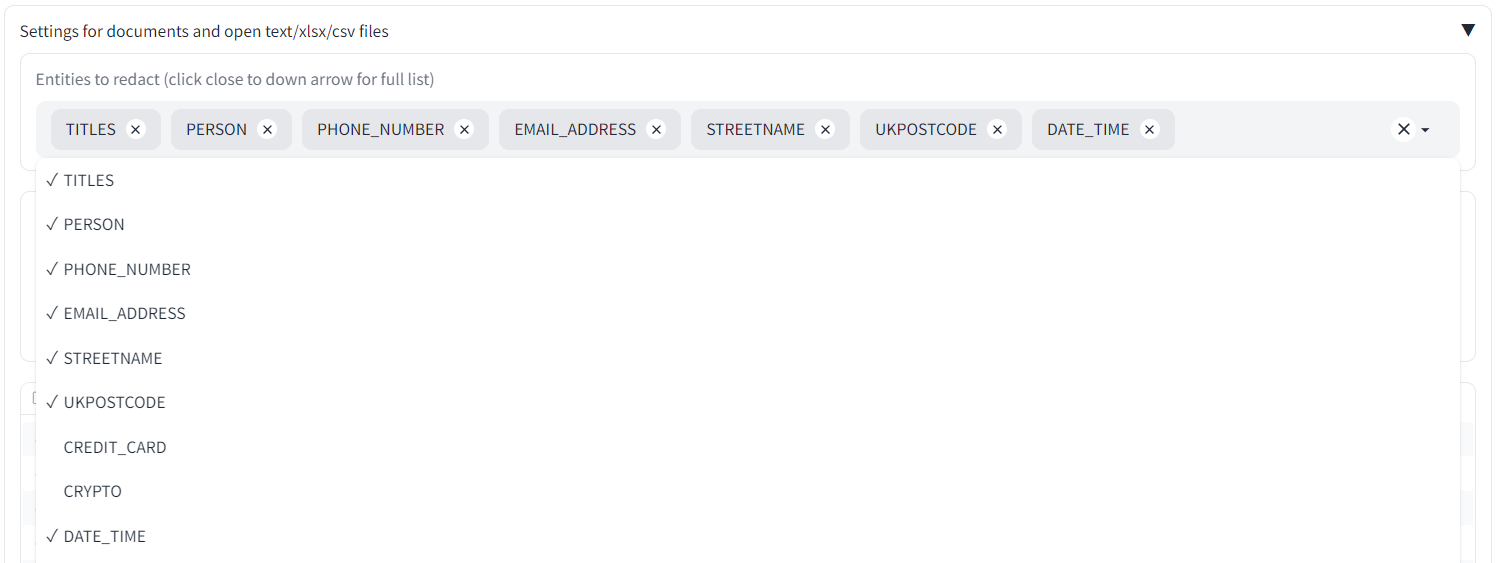
Under the 'Redaction settings' tab, go to 'Entities to redact (click close to down arrow for full list)'. Different dropdowns are provided according to whether you are using the Local service to redact PII, or the AWS Comprehend service. Click within the empty box close to the dropdown arrow and you should see a list of possible 'entities' to redact. Select 'DATE_TIME' and it should appear in the main list. To remove items, click on the 'x' next to their name.
Now, go back to the main screen and click 'Redact Document' again. You should now get a redacted version of 'Example complaint letter' that has the dates and times removed.
If you want to redact different files, I suggest you refresh your browser page to start a new session and unload all previous data.
Redacting only specific pages
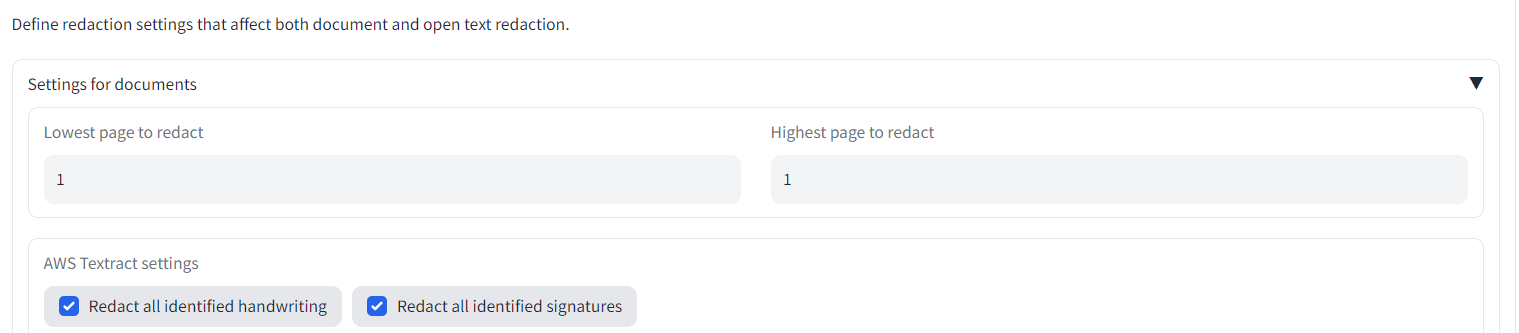
Say also we are only interested in redacting page 1 of the loaded documents. On the Redaction settings tab, select 'Lowest page to redact' as 1, and 'Highest page to redact' also as 1. When you next redact your documents, only the first page will be modified.
Handwriting and signature redaction
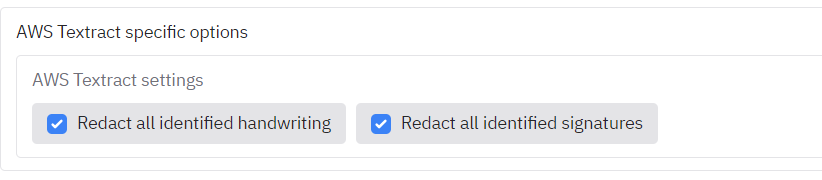
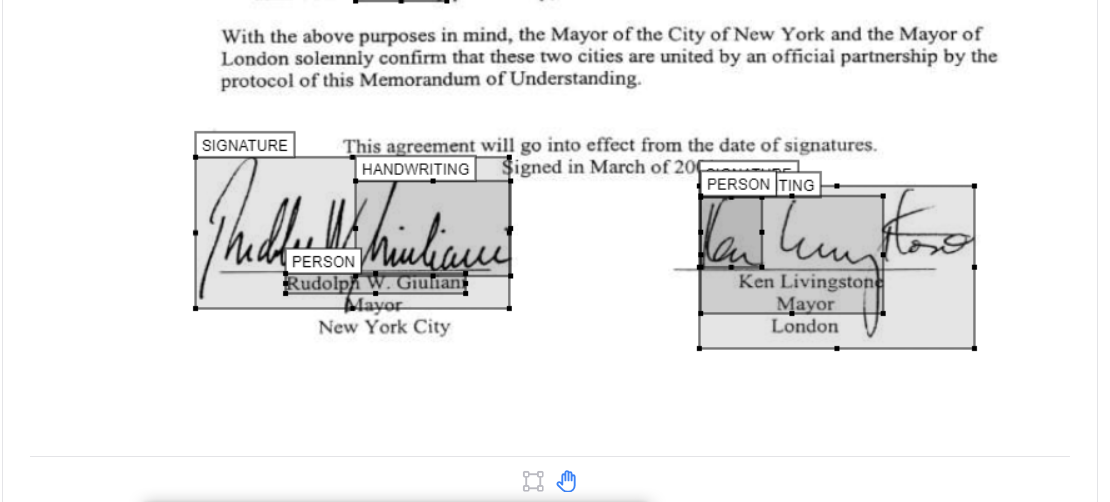
The file Partnership Agreement Toolkit (for signatures and more advanced usage) is provided as an example document to test AWS Textract + redaction with a document that has signatures in. If you have access to AWS Textract in the app, try removing all entity types from redaction on the Redaction settings and clicking the big X to the right of 'Entities to redact'. Ensure that handwriting and signatures are enabled for redaction on the Redaction Settings tab(enabled by default):
The outputs should show handwriting/signatures redacted (see pages 5 - 7), which you can inspect and modify on the 'Review redactions' tab.
Reviewing and modifying suggested redactions
Quite often there are certain terms suggested for redaction by the model that don't match quite what you intended. The app allows you to review and modify suggested redactions for the last file redacted. Refresh your browser tab. On the first tab 'PDFs/images' upload the 'Example of files sent to a professor before applying.pdf' file. Let's stick with the 'Local model - selectable text' option, and click 'Redact document'. Once the outputs are created, go to the 'Review redactions' tab.
On this tab you have a visual interface that allows you to inspect and modify redactions suggested by the app.
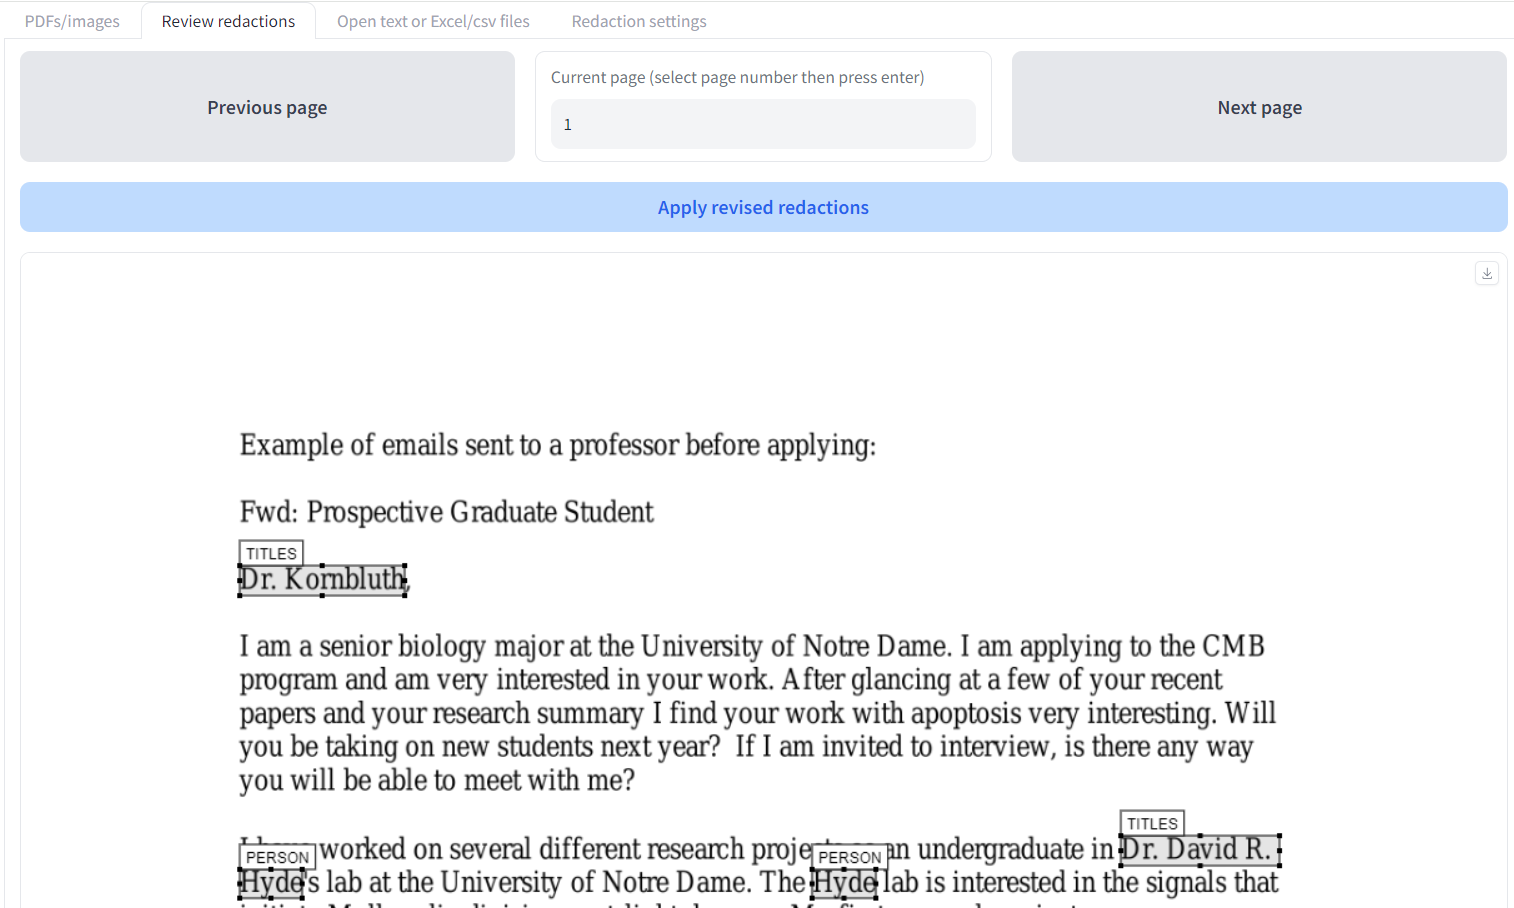
You can change the page viewed either by clicking 'Previous page' or 'Next page', or by typing a specific page number in the 'Current page' box and pressing Enter on your keyboard. Each time you switch page, it will save redactions you have made on the page you are moving from, so you will not lose changes you have made.
On your selected page, each redaction is highlighted with a box next to its suggested entity type. By default the interface allows you to modify existing redaction boxes. Click and hold on an existing box to move it. Click on one of the small boxes at the edges to change the size of the box. To delete a box, click on it to highlight it, then press delete on your keyboard. Alternatively, double click on a box and click 'Remove' on the box that appears.
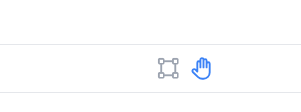
To change to 'add new redactions' mode, scroll to the bottom of the page. Click on the box icon, and your cursor will change into a crosshair. Now you can add new redaction boxes where you wish.
On the right of the screen there is a dropdown and table where you can filter to entity types that have been found throughout the document. You can choose a specific entity type to see which pages the entity is present on. If you want to go to the page specified in the table, you can click on a cell in the table and the review page will be changed to that page.
Note that the table currently only shows entity types, and not specific found text. So for instance if you provide a list of specific terms to redact in the deny list, they will all be labelled just as 'CUSTOM'. A feature to include in the near term will include being able to view specific redacted text in this table to get a better sense of the PII entities found.
Once you happy with your modified changes throughout the document, click 'Apply revised redactions' at the top of the page. The app will then run through all the pages in the document to update the redactions, and will output a modified PDF file. The modified PDF will appear at the top of the page in the file area. It will also output a revised '...review_file.csv' that you can then use for future review tasks.

Any feedback or comments on the app, please get in touch!
ADVANCED USER GUIDE
This advanced user guide will go over some of the features recently added to the app, including: modifying and merging redaction review files, identifying and redacting duplicate pages across multiple PDFs, 'fuzzy' search and redact, and exporting redactions to Adobe Acrobat.
Table of contents
- Modifying and merging redaction review files
- Identifying and redacting duplicate pages
- Fuzzy search and redaction
- Export redactions to and import from Adobe Acrobat
Modifying and merging redaction review files
You can find the folder containing the files discussed in this section here.
As well as serving as inputs to the document redaction app's review function, the 'review_file.csv' output can be modified outside of the app, and also merged with others from multiple redaction attempts on the same file. This gives you the flexibility to change redaction details outside of the app.
Modifying existing redaction review files
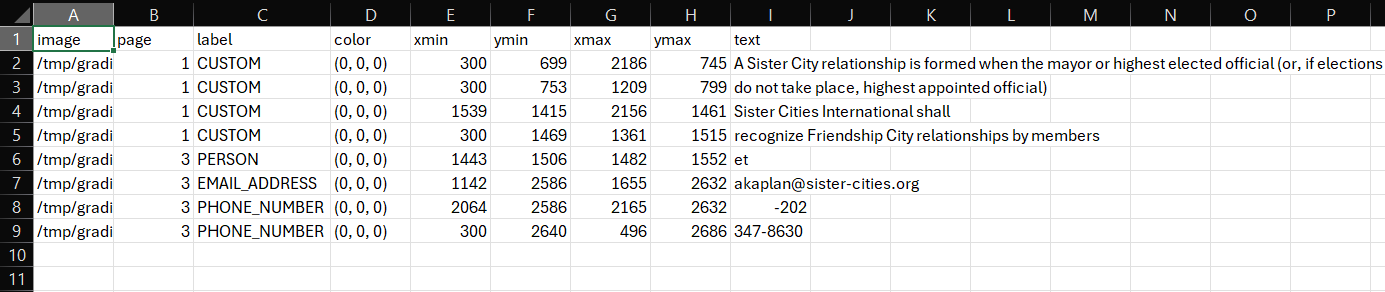
If you open up a 'review_file' csv output using a spreadsheet software program such as Microsoft Excel you can easily modify redaction properties. Open the file 'Partnership-Agreement-Toolkit_0_0_redacted.pdf_review_file_local.csv', and you should see a spreadshet with just four suggested redactions (see below). The following instructions are for using Excel.
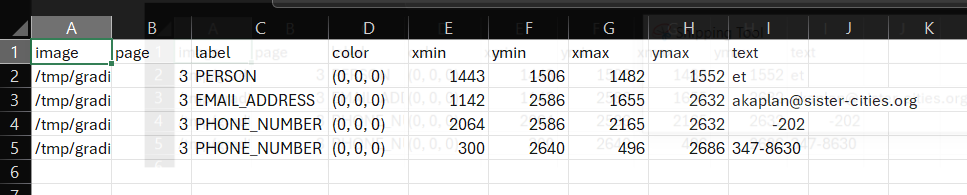
The first thing we can do is remove the first row - 'et' is suggested as a person, but is obviously not a genuine instance of personal information. Right click on the row number and select delete on this menu. Next, let's imagine that what the app identified as a 'phone number' was in fact another type of number and so we wanted to change the label. Simply click on the relevant label cells, let's change it to 'SECURITY_NUMBER'. You could also use 'Finad & Select' -> 'Replace' from the top ribbon menu if you wanted to change a number of labels simultaneously.
How about we wanted to change the colour of the 'email address' entry on the redaction review tab of the redaction app? The colours in a review file are based on an RGB scale with three numbers ranging from 0-255. You can find suitable colours here. Using this scale, if I wanted my review box to be pure blue, I can change the cell value to (0,0,255).
Imagine that a redaction box was slightly too small, and I didn't want to use the in-app options to change the size. In the review file csv, we can modify e.g. the ymin and ymax values for any box to increase the extent of the redaction box. For the 'email address' entry, let's decrease ymin by 5, and increase ymax by 5.
I have saved an output file following the above steps as 'Partnership-Agreement-Toolkit_0_0_redacted.pdf_review_file_local_mod.csv' in the same folder that the original was found. Let's upload this file to the app along with the original pdf to see how the redactions look now.
We can see from the above that we have successfully removed a redaction box, changed labels, colours, and redaction box sizes.
Merging existing redaction review files
Say you have run multiple redaction tasks on the same document, and you want to merge all of these redactions together. You could do this in your spreadsheet editor, but this could be fiddly especially if dealing with multiple review files or large numbers of redactions. The app has a feature to combine multiple review files together to create a 'merged' review file.

You can find this option at the bottom of the 'Redaction Settings' tab. Upload multiple review files here to get a single output 'merged' review_file. In the examples file, merging the 'review_file_custom.csv' and 'review_file_local.csv' files give you an output containing redaction boxes from both. This combined review file can then be uploaded into the review tab following the usual procedure.
Identifying and redacting duplicate pages
The files for this section are stored here.
Some redaction tasks involve removing duplicate pages of text that may exist across multiple documents. This feature calculates the similarity of text in all pages of input PDFs, calculates a similarity score, and then flags pages above a certain similarity score (90%) for removal by creating a 'whole page' redaction list file for each input PDF.

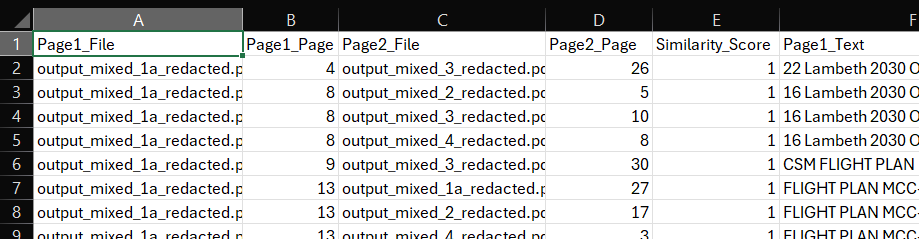
The similarity calculation is based on using the 'ocr_outputs.csv' file that is output every time that you perform a redaction task. From the file folder, upload the four 'ocr_output.csv' files provided in the example folder into the file area. Click 'Identify duplicate pages' and you will see a number of files returned. In case you want to see the original PDFs, they are available here.

First, there is a 'combined_ocr_result...' file that just merges together all the text from the input files. 'page_similarity_results.csv' shows a breakdown of the pages from each file that are most similar to each other above the threshold (90% similarity). You can compare the text in the two columns 'Page_1_Text' and 'Page_2_Text'.
The remaining output files are suffixed with '_whole_page.csv'. These are the same files that can be used to redact whole pages as described in the 'Full page redaction list example' section. For each PDF involved in the duplicate detection process, you can upload the relevant '_whole_page.csv' file into the relevant area, then do a new redaction task for the PDF file without any entity types selected. This way, only the suggested whole pages will be suggested for redaction and nothing else.

If you want to combine the results from this redaction process with previous redaction tasks for the same PDF, you could merge review file outputs following the steps described in Merging existing redaction review files above.
Fuzzy search and redaction
The files for this section are stored here.
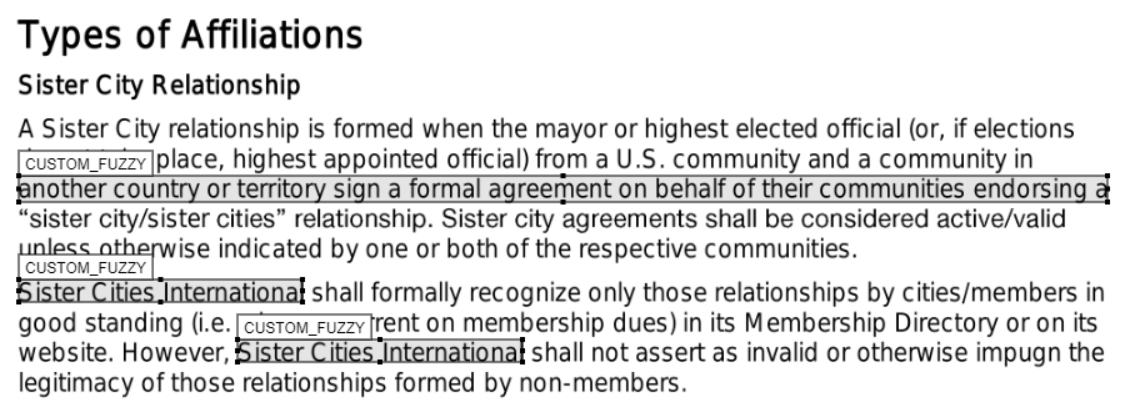
Sometimes you may be searching for terns that are slightly mispelled throughout a document, for example names. The document redaction app gives the option for searching for long phrases that may contain spelling mistakes, a method called 'fuzzy matching'.
To do this, go to the Redaction Settings, and the 'Select entity types to redact' area. In the box below relevant to your chosen redaction method (local or AWS Comprehend), select 'CUSTOM_FUZZY' from the list. Next, we can select the maximum number of spelling mistakes allowed in the search (up to nine). Here, you can either type in a number or use the small arrows to the right of the box. Change this option to 3. This will allow for a maximum of three 'changes' in text needed to match to the desired search terms.
The other option we can leave as is (should fuzzy search match on entire phrases in deny list) - this option would allow you to fuzzy search on each individual word in the search phrase (apart from stop words).
Next, we can upload a deny list on the same page to do the fuzzy search. A relevant deny list file can be found here - you can upload it following these steps. You will notice that the suggested deny list has spelling mistakes compared to phrases found in the example document.

Upload the Partnership-Agreement-Toolkit file into the 'Redact document' area on the first tab. Now, press the 'Redact document' button.
Using these deny list with spelling mistakes, the app fuzzy match these terms to the correct text in the document. After redaction is complete, go to the Review Redactions tab to check the first tabs. You should see that the phrases in the deny list have been successfully matched.
Export to and import from Adobe
Files for this section are stored here.
Exporting to Adobe Acrobat
The Document Redaction app has a feature to export suggested redactions to Adobe, and likewise to import Adobe comment files into the app. The file format used is the .xfdf Adobe comment file format - you can find more information about how to use these files here.
To convert suggested redactions to Adobe format, you need to have the original PDF and a review file csv in the input box at the top of the Review redactions page.

Then, you can find the export to Adobe option at the bottom of the Review redactions tab. Adobe comment files will be output here.

Once the input files are ready, you can click on the 'Convert review file to Adobe comment format'. You should see a file appear in the output box with a '.xfdf' file type. To use this in Adobe, after download to your computer, you should be able to double click on it, and a pop-up box will appear asking you to find the PDF file associated with it. Find the original PDF file used for your redaction task. The file should be opened up in Adobe Acrobat with the suggested redactions.
Importing from Adobe Acrobat
The app also allows you to import .xfdf files from Adobe Acrobat. To do this, go to the same Adobe import/export area as described above at the bottom of the Review Redactions tab. In this box, you need to upload a .xfdf Adobe comment file, along with the relevant original PDF for redaction.

When you click the 'convert .xfdf comment file to review_file.csv' button, the app should take you up to the top of the screen where the new review file has been created and can be downloaded.
